 Add Vertical Brace ( Modeling > F2 >
  Structural Steel > select " Vert Brc ")
Tool summary :
- Adds a vertical brace to the 3D model. Locate two points and make entries on the Vertical Brace Edit window to define the brace.
- For HSS/TS, wide flange, S shape, welded plate wide flange and pipe vertical braces, two work points define the neutral axis of the vertical brace's main material. For an angle vertical brace, the two work points align along the leg to gusset. It is often easier to place work points for vertical bracing while in an elevation view .
- To quickly input vertical braces to beams, you can add them to the top of the beams using EXPT or INCM , then use Set Vertical Brace Workpoints to 1/2 Nominal Depth of Supporting Beam (
 ) to move their work points down, then Process and Create Solids .
- To get a new vertical brace that is similar to one that was previously added, double-click the previously added brace and press " OK " on its edit window without changing anything. Then Add Vertical Brace . To get a duplicate vertical brace that is the exact length and orientation of the original, you can -- instead of locating two points -- middle-click ( Repeat ) while the point-location target (
 ) is where you want the to-be-added brace's left-end work point.
- See (on this page):
Also see :
- Modeling (where Add Vertical Brace is a tool)
- Vertical Brace Edit window (opens with Add Vertical Brace unless you show the options bar)
- Show member add options bar ( User and Site Options > Modeling > ) ( )
- Automatically process after modeling operation ( User and Site Options > Modeling > )
- Member component items to copy/repeat ( User and Site Options > Site >, affects Repeat )
- Member status items to copy/repeat ( User and Site Options > Site >, affects Repeat )
- How left end relates to work point coordinates (topic)
- Brace Gusset Plates (setup of Add Vertical Brace )
- Member Copy (alternative to Add Vertical Brace )
- Erase Member (to undo Add Vertical Brace )
- Edit Member (various ways to edit a brace)
- Select a brace, right-click (Menu) , choose " Edit " (one way to edit a brace)
- "Edit Other" to edit all members under one mark (highly recommended)
- Move/Stretch Members (to stretch/move braces)
- Move/Stretch Members, Include Material (same as Move/Stretch Members , but often better)
- Constructing the 3D Model (topic)
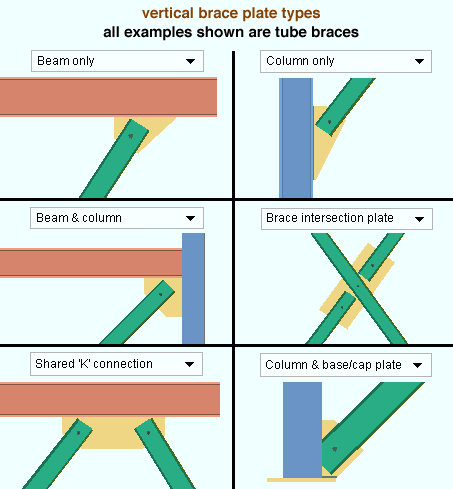
- Connection guide (examples of vertical brace connections)
page 1 | contents | F2 > structural steel > vertical brace | top
Vertical brace framing situations and some videos :
Below are some examples of vertical brace connections. The type of vertical brace connection you get depends on the framing situation, which depends on how the vertical brace is added.
|
|
page 1 | contents | F2 > structural steel > vertical brace | top
Step-by-step instructions :
Add Vertical Brace can be used to place braces with vertical gusset plates in the 3D model of your current Job. The following instructions assume that you are using a 3-button mouse.
1 . Before adding the vertical brace(s):
1a : Open an elevation view . Although you can Add a vertical brace in a plan view then change the " End elevation " on one or both ends of the brace, it is usually easiest to Add a vertical brace in an elevation view.
1b : Lay out grid lines or construction lines so that there are points of intersection ( INCL points) wherever you want to place the work points of the vertical brace(s) you are adding.
1c : Optionally set the toolbar icon or set User and Site Options > Modeling > " Automatically process after modeling operation " to a choice that will cause the vertical brace you are adding to automatically have solids created and piecemarks applied when you press " OK " to close the Vertical Brace Edit window that opens in step 4.
Tip: Reference the elevation (Z coordinate) reported on the X-Y-Z display while doing the Add Vertical Brace operation to ensure that the elevations you place the brace's work points at are correct.
2 . Invoke Add Vertical Brace using any one (1) of the following methods:
- Right-click ( Menu ) and choose Add Member > Structural Steel > Horizontal Brace .
- On your ribbon, click the Add Horizontal Brace icon. If the icon is not currently on the ribbon, you can add it using the Ribbon Editor . In the Ribbon Editor , choose Model -- Member > Add Horizontal Brace .
- Use a keyboard shortcut (for example, F2 ). Add Horizontal Brace is in the keyboard configuration " Command group " called ' Model -- Member '.
- With Member Mode mouse bindings active, middle-click ( Add ). On the selection dialog that opens, double-click " Horizontal Brace. "
- You can also add the tool to a mode of your choice. In Mode Configuration , the tool can be selected from the " Command group " called ' Model -- Member '.
3 . Various Locators become active along with Locate - Repeat - Return mouse bindings. Do the following to locate the vertical brace's two work points:
|
|
|
bindings |
3a : Select a Locate option (e.g. INCL ). Place the mouse pointer (
) so that the point location target (
3b : The status line prompts, "Locate second point:" Reposition the point location target (
Note 1: The work points you located define the neutral axis of a W , S , HSS round or HSS rectangular vertical brace. For a W tee or S tee vertical brace, the workline is drawn through the top flange center line if the stem is ' Horizontal ' or along the connection bolt line nearest the tee flange if the stem is ' Vertical '. For a single angle vertical brace, the workline is placed along the surface of the angle leg that attaches to the gusset per the selection made to " Locate on neutral axis ." For a channel vertical brace, the workline is at the half-depth of the heel of the channel (the channel web is vertical).
Note 2: Vertical braces can be perfectly vertical or horizontal as well as sloping. Both perfectly vertical and perfectly horizontal braces can share a gusset with another brace.
Note 3: Connection design can create automatic connections on vertical braces in X, K and W configurations (see example ). It used to be, for three-point bracing that you would get the failure message " Invalid shared brace configuration " if the center brace was not perpendicular to the supporting member. That restriction no longer applies.
Note 4: A brace intersection plate for X bracing can be designed for L , WT , C and double-angle bracing. X bracing can also be achieved with a center brace that is a wide flange . Any material type can be used for a vertical brace that connects to a wide flange vertical brace.
Note 5: Work points for brace-to-column connections must be at the workline (center) of the column. This is not the case for brace-to-beam connections.
4 . The Vertical Brace Edit window opens. On it are settings for the vertical brace whose work points you located in step 3.Since process on the fly takes place even before the window opens, all relevant connection design locks are available to you immediately after the window opens, and process on the fly will continuously update connection design locks as you make changes on the edit window.
Alternative 1 : Edit the settings as desired (see the notes below), then press the " OK " button. Go to step 5.
Alternative 2 : Press the " Cancel " button to close this window and go back to step 3.
Note 1: If two or three braces share a gusset plate, each brace should have similar material types (so that the connection to the gusset is similar). They should also be similar in size.
Note 2: In order to get a connection on the end of a vertical brace, the " Section size " must be L , C , W , S , HSS rectangular , HSS round , ST or WT material. You can also use welded plate wide flange material if its flanges are equal.
Note 3: For a wide flange (or S shape ) vertical brace, the " Section size " must be between W6 and W30 (S6 and S30). Where wide flange or S shape braces frame together at an X or K juncture, both braces must have the same " Web orientation ."
Note 4: The default settings that appear on the Vertical Brace Edit window are those of the last vertical brace added or edited in this session of Modeling . Even if all you do is double-click a vertical brace and press " OK " on its edit window, that brace's settings become the defaults for the next-added vertical brace (exception: see " Swap member ends "). You therefore only have to make changes to those settings which are different for the newly added vertical brace.
5 . The vertical brace whose settings you entered in step 4, and whose work points you located in step 3, appears in stick form on screen. Locate - Repeat - Return mouse bindings become active. If User and Site Options > Modeling > " Automatically process after modeling operation " is ' Process and create solids ', the new vertical brace will have automatically undergone all phases of Process and Create Solids . If that option is ' Process ' or ' Do nothing ', you will have to Process > Process and Create Solids in order to have the member piecemarked and able to be displayed in a solid form . Do one (1) of the following:
|
|
|
bindings |
Alternative 1 : Move your mouse pointer (
Alternative 2 : Follow these instructions beginning with step 3 to add a vertical brace whose settings or orientation is different than the one you just added.
Alternative 3 : Right-click ( Return ) when you are done adding vertical braces.
Note: The stick representation of a brace includes a direction symbol showing the brace orientation.
The toes of this channel brace point away from you.

The legs of this double angle brace point away from you.
page 1 | contents | F2 > structural steel > vertical brace | top
Adding vertical braces using the options bar (classic) :
|
|
User and Site Options > Modeling > " Show member add options bar " can be set to ' Disabled ' or ' Top ' or ' Bottom '. When ' Top ' or ' Bottom ' is selected, extra space is allocated on your top or bottom toolbar to provide feedback and options related to the adding of a beam, column or brace. When you choose Model > Member > Add > Vertical Brace or invoke Add Vertical Brace using any other method , the options bar is activated, allowing you to quickly add vertical braces without having to open the Vertical Brace Edit window. Note in the following example that the left " End elevation " and right " End elevation " are unlocked ( ![]() ), which results in the elevation of the member ends being determined by the located points. Also, " User defined connection ") is disabled ( grayed out ) due to the " Input connection type " being set to ' Vbrc plate ' instead of ' User defined '.
), which results in the elevation of the member ends being determined by the located points. Also, " User defined connection ") is disabled ( grayed out ) due to the " Input connection type " being set to ' Vbrc plate ' instead of ' User defined '.
![]()
The " Continuous add mode " button (
or
) stops and starts continuous mode. Vertical braces added using continuous mode are end-to-end, with the second point of a just-added vertical brace the same as the first point of the next-added vertical brace. Continuous mode requires the location of fewer points than the two clicks (one for each end) that are required for a vertical brace added in non-continuous mode. You need to turn continuous mode off before you can add a vertical brace that is not end-to-end with the previously added vertical brace.
The " Launch member edit " button (
or
) stops and starts the opening of the Vertical Brace Edit window with each vertical brace that is added. The normal default that is applied to the first member added in a Modeling session is to not open the member's edit window. If you want the window to open, click the icon before you locate a point to add a vertical brace. The window opens for each vertical brace that is subsequently added during your current Modeling session until you click the icon again or restart Modeling .
page 1 | contents | F2 > structural steel > vertical brace | top